

How To Create A Classroom Blog In Google Classroom
Working Hard To Get My Fill
With the updates and revisions to the new Google Sites, many educators are wanting to use Sites for their student blogs, and there is just no easy way for students to also receive comments on their sites from their audience. There are a few ways to work around this, such as embedding blogs from actual blog sites, but at this point, I want my new high school bloggers to have control over the audience and for me to be able to keep an eye on the comments without having to do a lot of tab hopping. While many teachers just subscribed to blogging services dedicated to student blogging, like Google's Blogger, I really want to find a way for Google Sites to fill this need for me. Using Sites does not require extra permissions from guardians because it is covered under the permissions of G Suite for Education. Dedicated blogging sites, however, including Google's Blogger, require permission slips from guardians before using. I also like using Sites because access can be limited to an audience of only school accounts or open to the public. There is another really compelling reason to use Sites. It. Is. Free. So, here's an idea to make it work with student blogs.
Everybody Wants a Thrill
Create Google Classroom just for Blogging (using Google Sites)
Most of you may already have a Google Classroom class dedicated for your class or classes, and the idea of using it for blog commenting may seem unreasonable, but hear me out. This is a bit labor intensive to set up, but I believe it will work while we wait for Google to do their magic once again.
Step 1: Create a New Google Classroom
The first thing I did was create a new Google Classroom class and titled it Super Happy Fun Circle Time, because that is what I call the writing activity we do every Friday, and that's what we are going to use to test this commenting idea. In fact, this idea was born from a discussion my students and I had over how to make their stories more accessible to the other section of English II, and how they could leave feedback or positive comments too. We currently use the comment feature in Google Classroom for a variety of purposes, so it was natural that we turned to that first for a solution. So, create a new class, title it with whatever name you call your writing or blogging time, and open up a list of all of your students who will need to participate in this.
Payin' Anything to Roll the Dice
Step 2: Enter an announcement that asks students to comment with the link to their blog page (published link not editing rights link)
This step is very simple and takes only a few seconds. Click the plus, add an assignment about their writing/blogs, and direct students to turn their blog links in as an attached link. Once you have collected them all, you are ready to start making this work as a way for students to interact with each others writings on Google Sites, and possibly beyond.
Step 3: After Receiving Links, Now What?
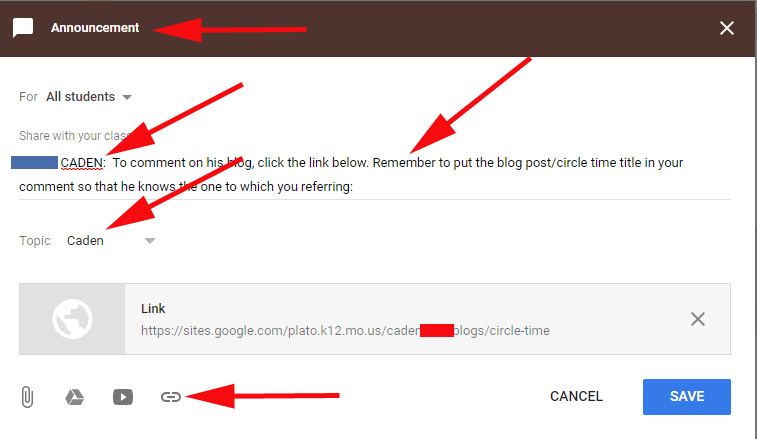
Create a "question" that is titled with a student name in your class. Create a question like this for each student. This is where the labor intensive part comes into play. The title of the question is one student's name, which I copied from my gradebook. Then I created the "topic" which is also that student's name. I used just first names unless there were multiples of that name, then I used first name and last initial. At the end of this post, there is an image with red arrows that show the information you need to enter.
Just One More Time
Step 4: The "Canned" Message
Now we're ready to paste in a "canned" message for each question. If you are like me and do not like working hard if technology can make life easier, then open Google Keep and paste in either the two messages I created below, or create your own, one boy and one girl message:
Girl Student -To comment on her blog, click the link below. Remember to put the blog post title in your comment so that she knows the one to which you are referring:
Boy Student : To comment on his blog, click the link below. Remember to put the blog post title in your comment so that he knows the one to which you are referring.
Some Will Win, Some Will Lose
Step 5: Grab Those Dropped Links
In the question for each student, add the link that was turned in by each student. Now, I split my windows so that I had the regular Google Classroom open and also the new blogging Google Classroom open. In the same window as the new blogging Classroom, open a tab for your Google Keep responses, so that you do have to float between tabs, but you can still copy each link and canned response into each student's question. Whew! As you can see in the image below, the topics are listed on the side and make it really easy to simply click on a student's name for their question to pop up, click on their link, and read their story/post. After reading, students will pop back into Classroom and enter their comment, including the post title so that the student who wrote the blog will know which one they are referring to in the comment.

Some Were Born to Sing the Blues
Step 6: Students Are FINALLY Ready to Comment
Now the fun begins. Think about how we blog and then share on Twitter as educators. We tweet out that we have a new post and include the link, others click the link, read the post, go back to Twitter and comment. (Yes, some people comment on the blog, but the majority of comments are back on the original tweet.) As I thought about that, I realized something. Huh. I can make that same format work with Google Classroom. So let's roll it out.
Oh, the Movie Never Ends
After we do our Super Happy Fun Circle Time Friday writings or our blog posts (yes, I'm a bit crazy), I will now tell students that they must read and comment on 3-5 posts from other students. The time I have remaining will likely dictate how many I want them to read. Students find the link by clicking the name of a person in the topics column, clicking the link in that announcement, read the story or blog post, then go back to Classroom to make their comment. The beauty of it is, they can read any of them from both my sections of English (small school, so….), and I won't restrict it to recent posts. They can read any 3-5 as long as it isn't from a student whose posts they have already read and commented on, so that eventually ever student will have read at least one story from every other student in class and interacted with it. The question feature, since it functions similar to the assignment option, will make it easy to track who comments on which posts.
It Goes On and On and On and On
Step 7: Busting Out of Our Classroom Walls
Once my students get familiar with the process and etiquette of commenting on other students' posts, my plan is to find another willing high school class, give their students my class code, have their teacher duplicate my process then give me their code. Now our students can enter that Classroom (see what I did there?) and read and comment on posts from students outside of our school, district, conference, state, and perhaps country. Sky's the limit. Let's do this.
For an expanded look at using other platforms for student blogging, as well as trying student vlogging and podcasting, see Google Classroom (Still) to the Rescue: Blogging, Vlogging, & Podcasting
Links for Getting Started
My Instructional Slides
My Sample Site
Slides instructions that I gave my Ss for their Sites and the link to my sample Site:
Partial song lyrics used as Headings are from Journey's Don't Stop Believin'. I wasn't playing it while writing, except in my head.
How To Create A Classroom Blog In Google Classroom
Source: https://rockntheboat.com/2018/01/09/blogging-with-google-sites-google-classroom-to-the-rescue-let-the-commenting-begin/
Posted by: crewsmistne.blogspot.com
0 Response to "How To Create A Classroom Blog In Google Classroom"
Post a Comment